In Spring Boot, a @Bean is a method-level annotation that is used to declare a bean and register it with the Spring container.
What is @Configuration in Spring Boot?
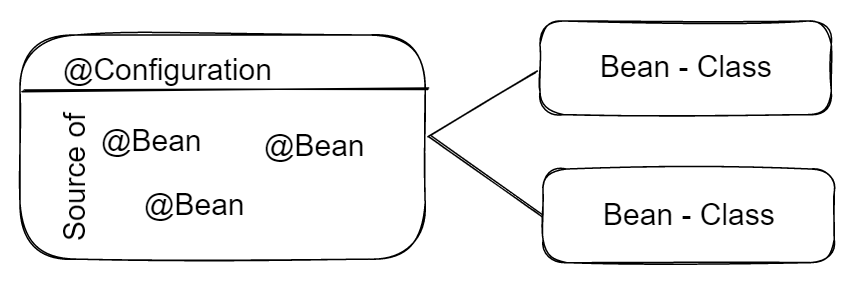
@Configuration annotation is used in Spring Boot to indicate that a class contains one or more bean definitions.
A bean is an object that is managed by the Spring framework and can be used to provide services or functionality to other parts of the application.
When a class is annotated with @Configuration, it is treated as a source of bean definitions, and any methods within the class that are annotated with @Bean will be used to create and configure beans.
@Configuration
public class AppConfig {

        // beans definition here

}
What is a Bean in Spring Boot?
A Bean is an object that is managed by the Spring framework.
It is created and managed by the Spring container. Beans can be used to encapsulate and provide services, utilities, and functionalities to other components in an application.
@Bean is an annotation that is used to declare a method as a bean so, to create a bean in Spring Boot, you simply annotate a method with @Bean.
The method should return an object that you want to register as a bean in the Spring container.
The Spring container will then manage the lifecycle of the bean and inject it into other components as needed.
Here’s an example of how to define a bean in Spring Boot using the @Bean annotation.
Note that this class is annotated with @Configuration so, we can create @Beans there.
@Configuration
public class AppConfig {

    @Bean
    public MultiplierService multiplier() {
        return new MultiplierService(2);
    }

}
In this example, MultiplierService is a class that provides some service that other components might use. The multiplier() method is annotated with @Bean, which tells Spring to treat it as a bean. When the Spring container starts up, it will call this method to create a new instance of MultiplierService. This instance will be managed by Spring and can be injected into other components that depend on it.
Note that the @Bean annotation is used within a @Configuration class, which is a special type of Spring component that defines configuration information for the application.
This is de MultiplierService class that we want to add like a Bean in our Configuration.
public class MultiplierService {

    private final int multiplier;

    public MultiplierService(int multiplier) {
        this.multiplier = multiplier;
    }

    public int multiply(int value) {
        return value * multiplier;
    }

}
How to use a Bean we have created
You can use a bean that you have created by autowiring it into another class or component.
Here’s an example of autowiring the ‘MultiplierService’ bean into our ‘AppService’:
@Service
public class AppService {

    private final MultiplierService multiplierService;

    public AppService(@Autowired MultiplierService multiplierService) {
        this.multiplierService = multiplierService;
    }

    public int calculate(int aValue) {
        return multiplierService.multiply(aValue);
    }

}
Note: Really you can omit @Autowired because so far we only have one defined Bean for the class and because if @Autowired is not present, Spring will look for a bean that satisfies the constructor.
How to give a name to a Bean
You can give a name to a bean by providing a name to the @Bean
annotation. This will be used as the name of the bean in the Spring container.
@Bean(name= "multiplierService")
public MultiplierService multiplier() {
    return new MultiplierService(2);
}
In this example, the @Bean annotation is given a value of “multiplierService”.
This will be used as the name of the bean in the Spring container instead of the default name, which is the name of the method that declares the bean (in this case, “multiplier”).
If you omit the string value from the @Bean annotation, Spring will use the default name based on the method name.
How to call a Bean by its name?
In Spring Boot, you can call a bean with a specific name using the @Qualifier annotation.
The @Qualifier annotation is used to specify the name of the bean that you want to use when there are multiple beans of the same type or simply when we want to particularly declare the bean to use.
Here’s an example:
With @Qualifier we tell Spring exactly what bean we need.
@Service
public class AppService {

    private final MultiplierService multiplierService;

    public AppService(@Autowired @Qualifier("multiplierService") MultiplierService multiplierService) {
        this.multiplierService = multiplierService;
    }

    public int calculate(int aValue) {
        return multiplierService.multiply(aValue);
    }

}
Note that the name given in the @Qualifier annotation should match the name of the bean that you want to use. If the name doesn’t match any beans in the container, Spring will throw an exception at runtime.
Also note that if you only have one bean of a given type, you don’t need to use @Qualifier since Spring can automatically wire it in. However, if you have multiple beans of the same type, you need to specify which one to use using @Qualifier.
What are alias names?
In Spring Boot, alias names are alternative names that can be given to a bean in addition to its primary name.
You can define alias names for a bean by using the @Bean annotation with a string array of alias names as shown in the example below:
@Configuration
public class AppConfig {

   @Bean(name = {"multiplierService",
            "multiplierService-alias1", "multiplierService-alias2"})
    public MultiplierService multiplier() {
        return new MultiplierService(2);
    }

}
You can use any number of alias names for a bean, and the alias names can be any valid string value. When you reference a bean by an alias name, Spring resolves it to the primary bean with that name.
What are initMethod and destroyMethod in @Bean?
In Spring Boot, initMethod and destroyMethod are optional attributes of the @Bean annotation that allow you to specify methods that should be called when the bean is initialized or destroyed, respectively.
Here’s you can see how to use init and destroy method:
@Configuration
public class AppConfig {

    @Bean(name = {"multiplierService",
            "multiplierService-alias1", "multiplierService-alias2"},
             initMethod = "init", destroyMethod = "destroy")
    public MultiplierService multiplier() {
        return new MultiplierService(2);
    }

}
In this example, the “multiplier()” method is annotated with @Bean which includes initMethod and destroyMethod attributes.
The initMethod attribute specifies that a method called “init()” should be called when the bean is initialized, and the destroyMethod attribute specifies that a method called “destroy()” should be called when the bean is destroyed.
The init() method can perform any initialization logic that the bean requires. This method is called after the bean has been created and its dependencies have been injected, but before the bean is made available for use.
The destroy() method can perform any cleanup logic that the bean requires. This method is called when the Spring container is shut down or the bean is destroyed by the container.
Note that the methods specified in initMethod and destroyMethod should have a void return type and take no arguments. If the method has a return type or takes arguments, Spring will throw an exception at runtime.
public class MultiplierService {

    private final int multiplier;

    public MultiplierService(int multiplier) {
        this.multiplier = multiplier;
    }

    public int multiply(int value) {
        return value * multiplier;
    }

    public void init() {
        System.out.println("Calling init method :)");
    }

    public void destroy() {
        System.out.println("Calling destroy method :(");
    }
}
Running this example:
If we run this complete example with this Spring Boot main class:
@SpringBootApplication
public class SpringBootBeanApplication {

    private final AppService appService;;

    public SpringBootBeanApplication(AppService appService) {
        this.appService = appService;
    }

    public static void main(String[] args) {
        SpringApplication.run(SpringBootBeanApplication.class, args);
    }

    @PostConstruct
    public void doExamples() {
        System.out.println("Calling bean method with this result: " +  appService.calculate(123));
    }

}
We can see this Output:
INFO 17028 --- [           main] c.g.s.SpringBootBeanApplication          : Starting SpringBootBeanApplication using Java 17.0.2 with PID 17028 (C:\dev\spring-boot-examples\spring-boot-bean\target\classes started by gustavo.peiretti in C:\dev\spring-boot-examples\spring-boot-bean)
INFO 17028 --- [           main] c.g.s.SpringBootBeanApplication          : No active profile set, falling back to 1 default profile: "default"
Calling init method :)
Calling bean method with this result: 246
INFO 17028 --- [           main] c.g.s.SpringBootBeanApplication          : Started SpringBootBeanApplication in 0.607 seconds (process running for 1.122)
Calling destroy method :(
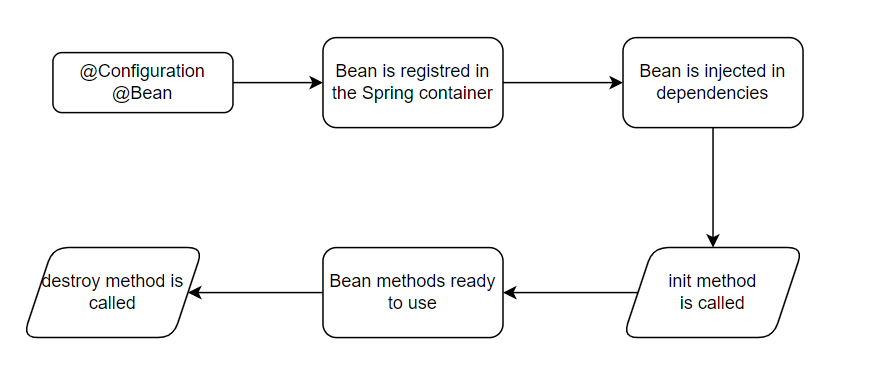
What is the life cycle of a @Bean?
In this example, the @Bean method is defined in a @Configuration class.
1- The bean definition is then registered in the Spring container, and the container instantiates and initializes the bean
2- Spring injecting any dependencies that the bean needs.
3- Init method is called.
3- Once the bean is fully initialized, it is available for use in the application.
4- When the application shuts down or the bean is destroyed by the container, any destroy method specified in the @Bean annotation is called.
ConditionalOnProperty annotation with Spring ‘Beans’
@ConditionalOnProperty annotation is used to conditionally create a Spring bean depending on the configuration of a property.
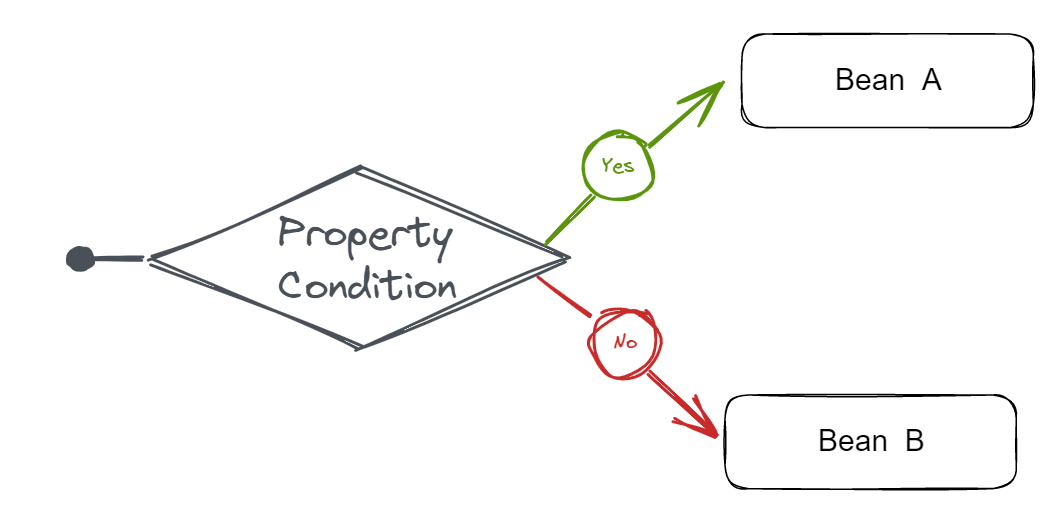
For example, we are going to create a bean named senderMessagesSms if sender.sms has a value of true and in negative case, senderMessagesEmail it will be created.
    @ConditionalOnProperty(name = "sender.sms", havingValue = "true")
    @Bean(name = "senderMessagesSms")
    public SenderMessages senderMessagesSms() {
        return new SenderMessagesSms();
    }

    @ConditionalOnProperty(name = "sender.sms", havingValue = "false")
    @Bean(name = "senderMessagesEmail")
    public SenderMessages senderMessagesEmail() {
        return new SenderMessagesEmail();
    }
But, ¿What happen if the property does not exist? For this case, we can use matchIfMissing parameter. So, if the property is not defined, the bean with that parameter set to true will be created.
matchIfMissing = true
    @ConditionalOnProperty(name = "sender.sms", havingValue = "true", matchIfMissing = true)
    @Bean(name = "senderMessagesSms")
    public SenderMessages senderMessagesSms() {
        return new SenderMessagesSms();
    }

    @ConditionalOnProperty(name = "sender.sms", havingValue = "false")
    @Bean(name = "senderMessagesEmail")
    public SenderMessages senderMessagesEmail() {
        return new SenderMessagesEmail();
    }
Conclusion
This is a summary of what we covered:
- In Spring Boot, a
@Beanis a method-level annotation that is used to declare a bean and register it with the Spring container. - A
@Beanmethod must be defined in a@Configurationclass, and it typically returns an instance of a class that you want to use as a bean in your application. - You can optionally specify a name for the bean using the
nameattribute of the@Beanannotation. - You can also specify an array of alias names for the bean using the
valueattribute of the@Beanannotation. - You can use dependency injection to inject a
@Beaninto another class or component, which allows you to use the bean in your application. - You can use the
initMethodanddestroyMethodattributes of the@Beanannotation to specify methods to be called when the bean is instantiated and destroyed. - The lifecycle of a
@Beanin Spring Boot includes registration, instantiation and initialization, dependency injection, and eventual destruction. - If you need to create a bean under some condition use ConditionalOnProperty annotation.
In conclusion, @Bean is a powerful annotation in Spring Boot that allows you to declare beans in a straightforward and intuitive way. You may register and use instances of your classes as beans in your application by creating @Bean methods in your @Configuration classes, and you can use Spring’s dependency injection architecture to efficiently manage your components' dependencies.
This code is in GitHub Spring Boot Code examples